Making of “Declining Nude”
This illustration is a bit older. But it is the first that seemed to me to be in the direction of a still-to-be-developed style of digital illustration during my first steps on the cintiq. Other illustrations of this period are more picturesque, more naturalistic.
In general, I like it when you can see art’s artificiality. In the concrete case of illustrations, I like the stroke, the outline, without it having to be a direct comic style.
In terms of content, this illustration was inspired by my teenage daughter and her messy room. More generally, it can be considered an allegory of our affluent society.
Diese Illustration ist schon ein bisschen älter. Doch es ist die erste, die mir während meiner ersten digitalen Gehversuche richtungsweisend für einen noch zu entwickelnden digitalen Illustrationsstil schien. Andere Illustrationen dieser Zeit sind malerischer, naturalistischer.
Generell mag ich es, wenn man der Kunst die Künstlichkeit ansieht. Im konkreten Fall von Illustrationen mag ich, wenn man den Strich, die Outline sieht, ohne dass es ein direkter Comic-Stil sein muss.
Inhaltlich wurde diese Illustration von meiner Teenager-Tochter und ihrem versauten Zimmer inspiriert. Allgemeiner betrachtet kann man sie als Allegorie unserer Überflussgesellschaft betrachten.
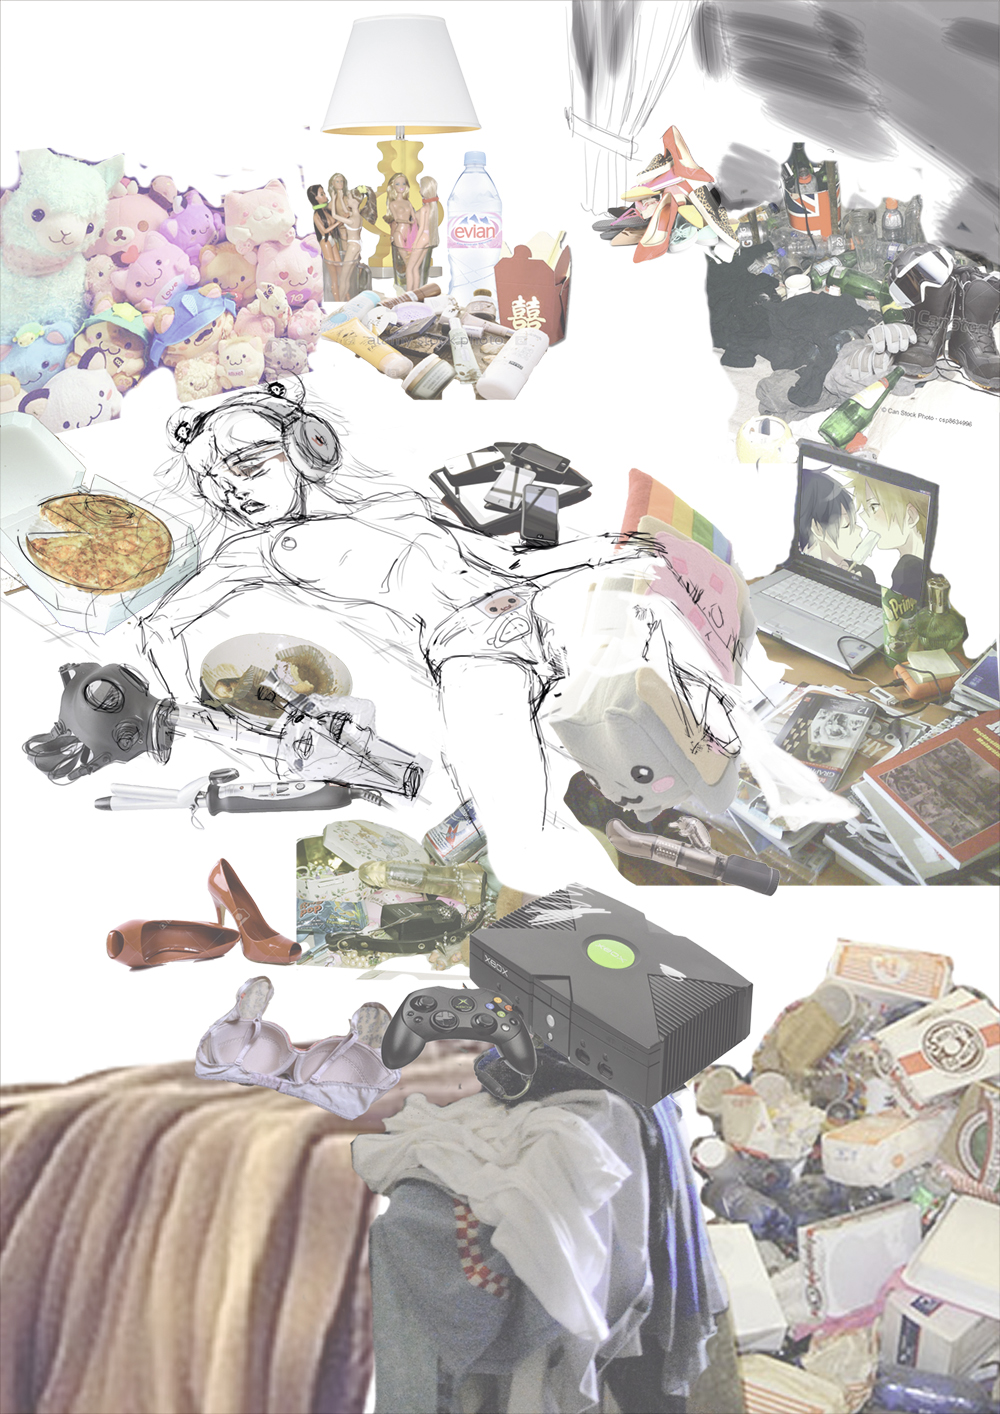
Schritt eins
Fast immer beginne ich mit relativ nervösen Skizzen. Ich brauche einige Zeit am Zeichenbrett, um mich zu beruhigen und genauer zu werden. Wie vielen ZeichnerInnen macht mir das Figurenzeichnen am meisten Spaß. Der Hintergrund ist eher eine Pflichtübung. Dank Photoshop muss ich mir nicht mehr alles selbst aus den Fingern saugen, sondern kann meinen Hintergrund munter collagieren und danach einfach durchpausen. Die Recherche nimmt zwar einige Zeit in Anspruch, macht aber mehr Spaß als mechanisches abzeichnen von Fotos, was ich ja ohnehin machen müsste.
Hier sehen Sie also die erste Ahnung unserer jungen Heldin inmitten ihrer Konsumartikel.
Step one
Almost always I start with relatively nervous sketches. I need some time on the drawing board to calm down and get more precise. Like for many Illustrators figure drawing is the fun part for me. The background is more of a compulsory exercise. Thanks to Photoshop, I no longer have to make everything up out of thin air, but can cheerfully collage my background and then simply trace it. The research takes some time, but it’s more fun than mechanical copying of photos, which I would have to do anyway.
So here’s the first idea of our young heroine in the midst of her consumer goods.
Schritt zwei
Schon ist es geschehen: Mein recherchiertes Material ist durchgepaust. Für gerade Kanten technischer Geräte verwende ich die Shift-Taste mit der Photoshop-Brush, um gerade Linien zu erzeugen. Formeigenschaften und Transfer der Brush schalte ich aus, um eine gleichbleibend dicke Linie zu erhalten. Sobald ich wieder in Freihandzeichen wechsle, schalte ich die Brush-Eigenschaften wieder ein.
Step two
It has already happened: My researched material is traced. For straight edges of technical devices, I use the shift key with the Photoshop brush to create straight lines. I turn off the shape and transfer settings of the brush to get a consistently thick line. As soon as I change back to freehand drawing, I switch the brush settings back on.
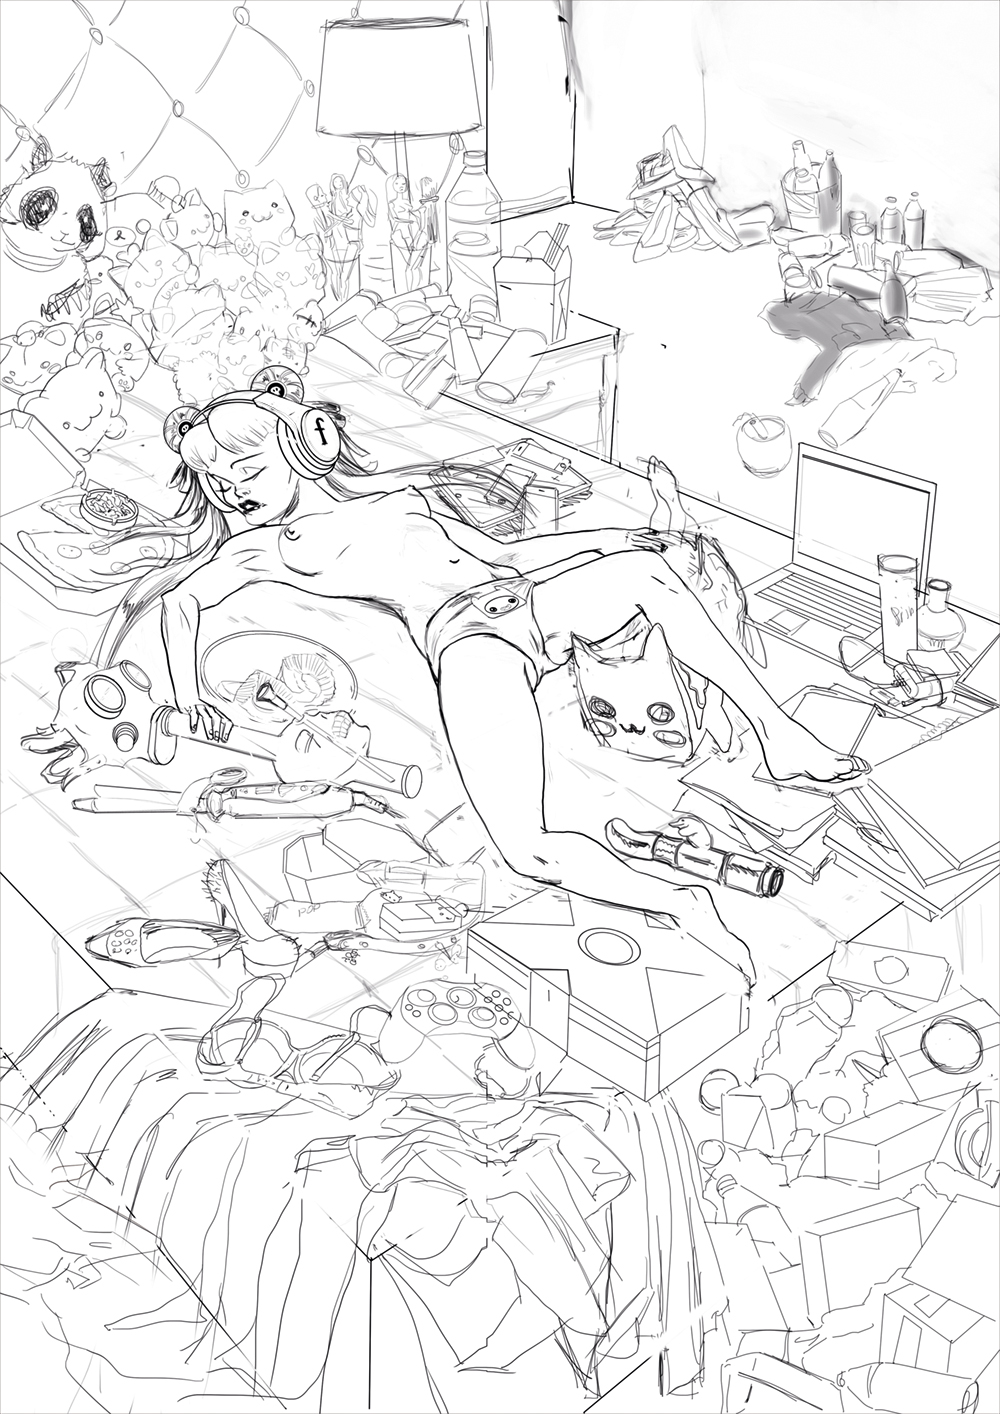
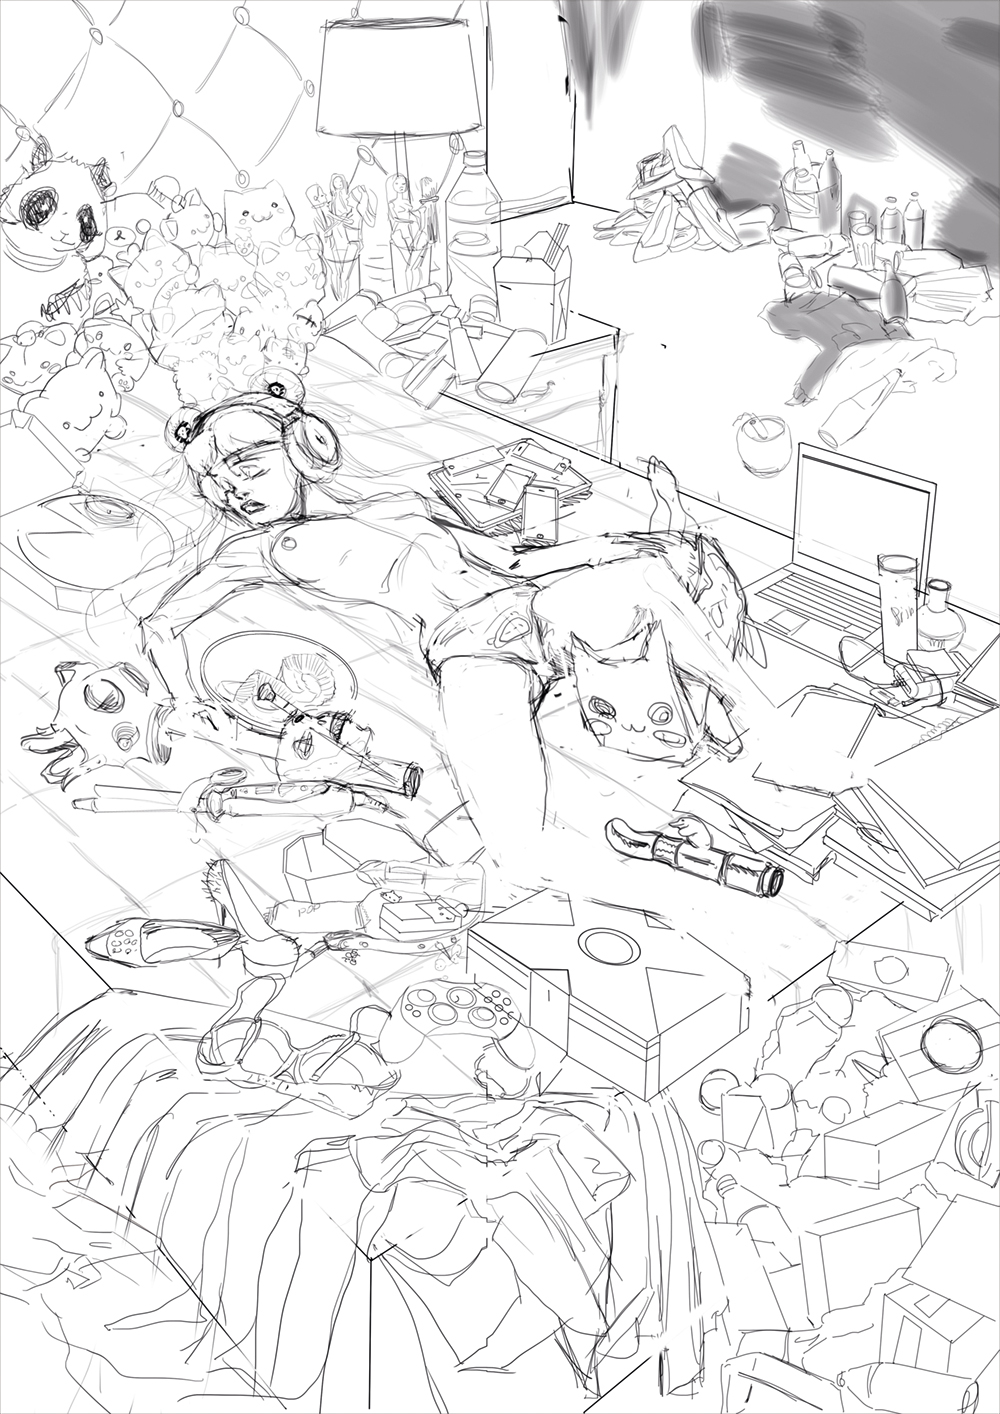
Schritt drei
Nun wird die Figur geinkt. Je nach Genauigkeit der Zeichnung ist das erheblich mehr oder weniger Aufwand. Der Stil der Reinzeichnung variiert je nach Illustration, und ich weiß nie genau, was dabei herauskommt. Hier scheine ich mir eindeutig 60er-isch francobelgisch beeinflusst zu sein. Kein Wunder, das bin ich auch, habe ich doch tonnenweise derartige Comics verschlungen. Ich weiß nie genau, wann sich welcher Einfluss in meiner Arbeit zeigt, jedoch kann ich sicher sein, dass es passiert. Keine Zeichnung entsteht im Vakuum.
Lange habe ich mich selbst geschummelt, indem ich mir vorgemacht habe, meine Vorzeichnung ist bereits sauber genug und ich kann den Reinzeichnungs-Schritt überspringen. Nicht wahr! Letztlich mündet eine schleissige Zeichnung in der Ausarbeitung immer in Mehraufwand.
Step three
Now the figure is inked. Depending on the accuracy of the drawing, this is considerably more or less effort. The style of the artwork varies according to the illustration, and I never know exactly what comes out. Here I seem to be clearly influenced by the 60s-Franco-Belgians. No wonder, I am, because I’ve devoured tons of these comics. I never know exactly which of my influences will show in my work, but I can be sure that it happens. No drawing is created in vacuo.
For a long time I cheated on myself by pretending that my preliminary drawing is already clean enough and I can skip the final cleanup. Not true! Ultimately, a tacky sketch always leads to additional expenditure in the rendering process.
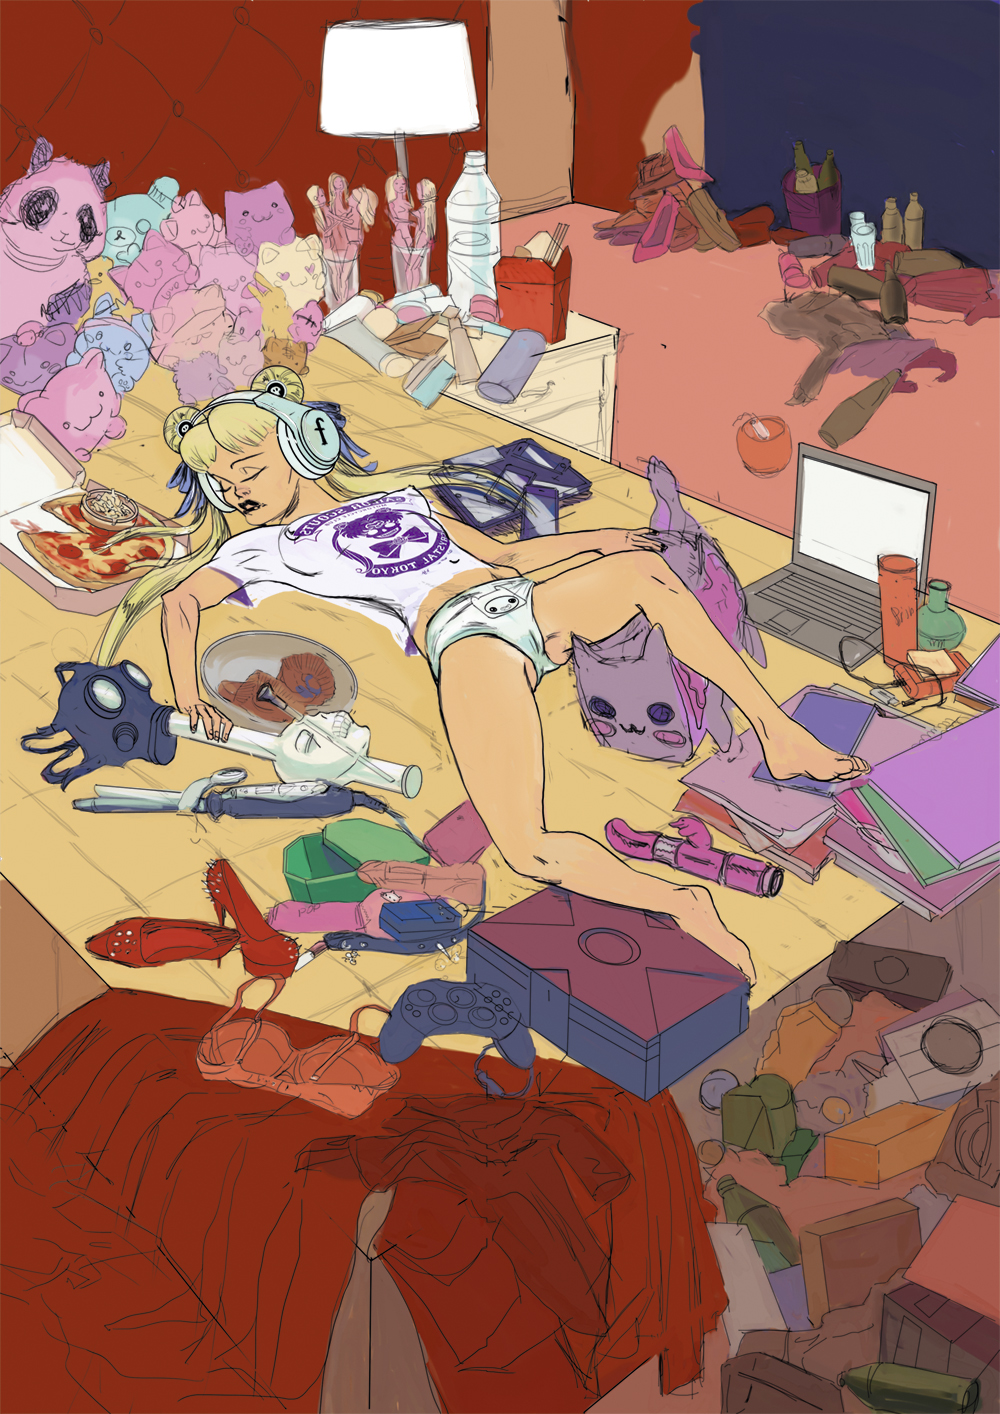
Schritt vier
Malen nach Zahlen! Alle Flächen werden auf einer unter der Ink-Ebene liegenden Ebene schön ausgemalt. Auch wenn das eine relativ mechanische Arbeit ist, achte ich schon hier auf ein Farbkonzept mit reduzierter Palette: in diesem Fall Rot-und Gelbtöne mit einem hellen Zentrum.
Step four
Painting by numbers! All planes are beautifully painted on a layer below the ink layer. Although this is a relatively mechanical work, I already pay attention to a color concept with a reduced range: in this case, reds and yellows with a bright center.

Schritt fünf
Oh, das Wunder farbiger Outlines und verschiedenen Ebenen-Blendmodi! Es entzückt mich immer wieder. Vielleicht mach ich einmal ein Schritt-für-Schritt Tutorial zum Konturen einfärben, jedoch nicht hier und jetzt.
Step five
Oh, the wonder of colored outlines and different layer blending modes! It always enchants me. Maybe I’ll do a step-by-step tutorial for coloring contours, but not here and now.
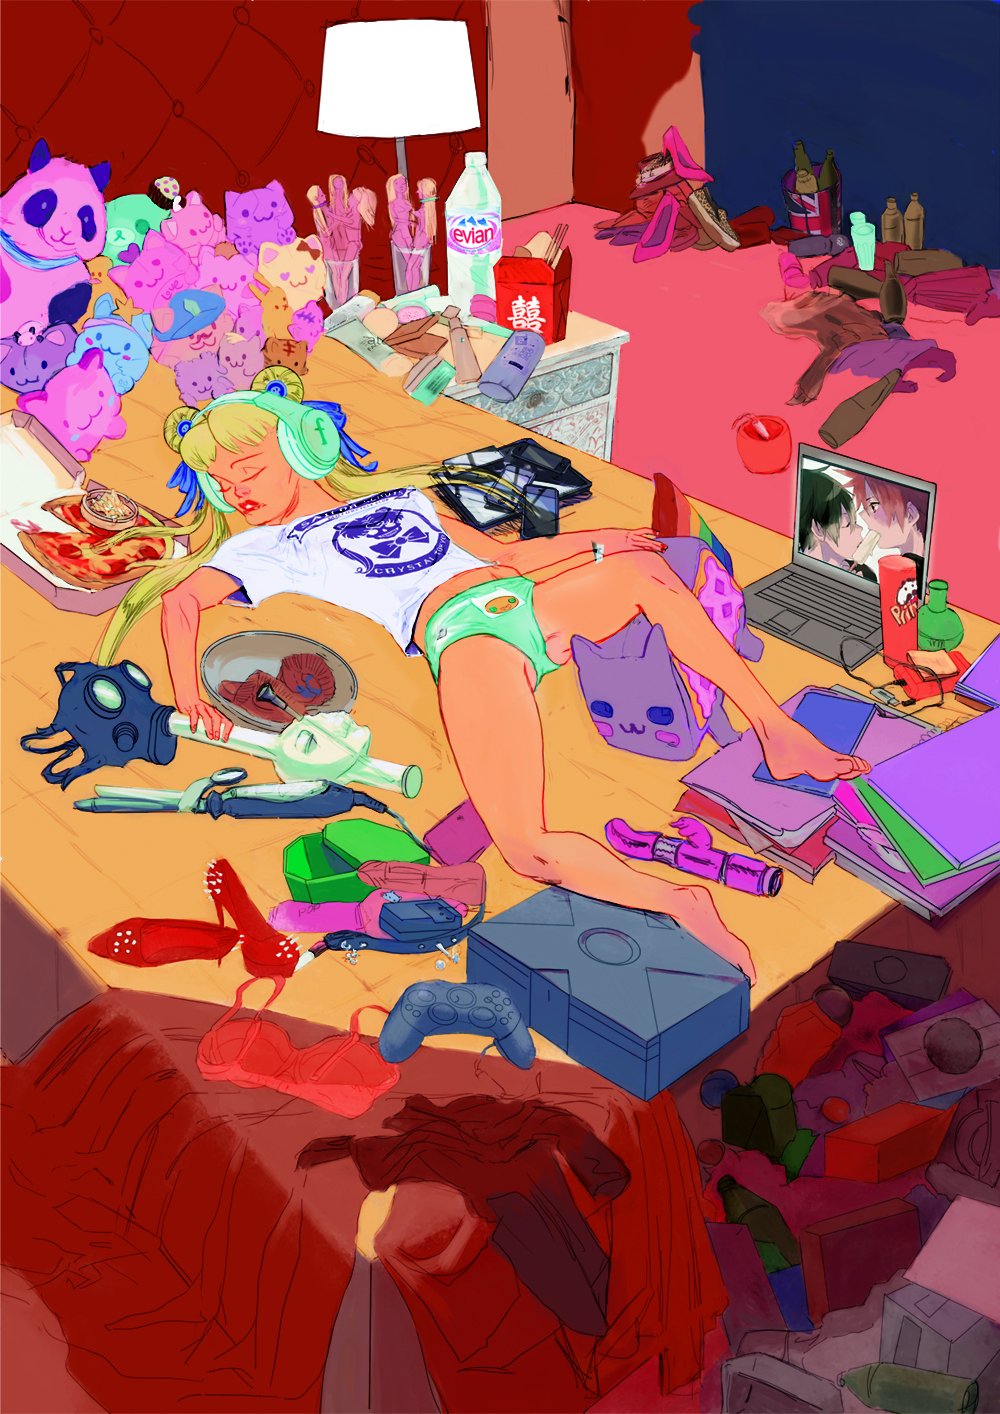
Schritt sechs
Ein bisschen räumliche Anmutung durch hellere Farben in den beleuchteten Bereichen. Das kann direkt auf der Farbebene oder auf einer darüberliegenden Ebene im Negativ-Multiplizieren-Modus passieren. Je mehr Routine man mit der Zeit bekommt, umso weniger Ebenen braucht man erfahrungsgemäß.
Step six
A little bit of threedimensional impression through lighter colors in the lit areas. This can happen directly on the color layer or on an overlying layer in screen blending mode. The more routine you get over time, the less layers you will need.

Schritt sieben
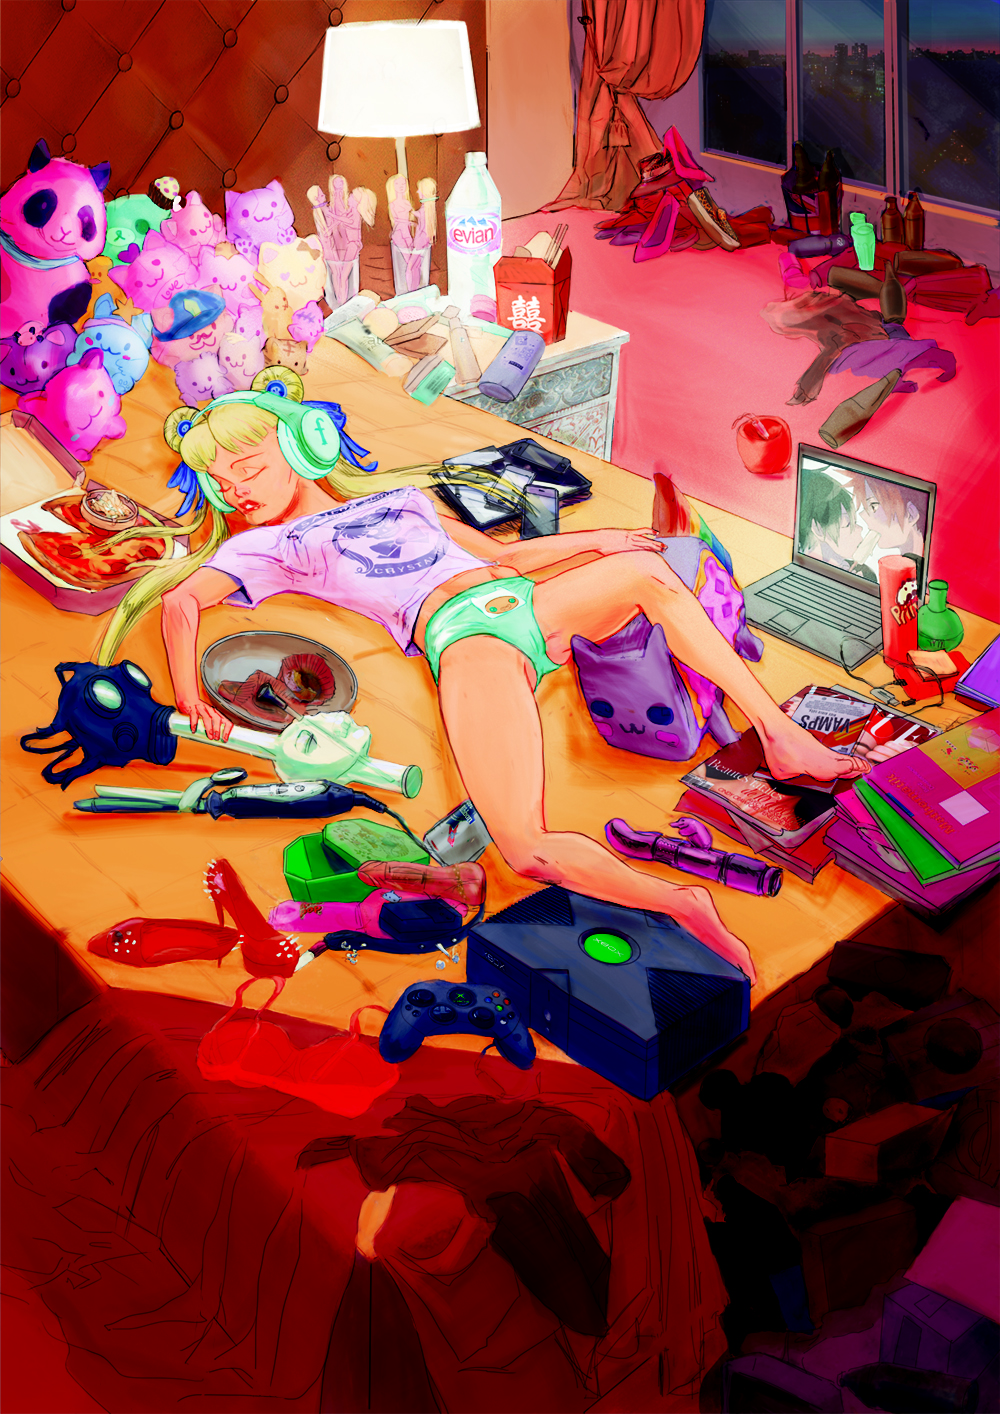
Push die Mitte mit weiß. Gerade, wenn ein Bild aus so vielen Einzelteilen besteht, ist ein eindeutiges Zentrum der Komposition wichtig. Das geht am einfachsten mit Tonwerten.
Step seven
Push the middle with white. Especially when a picture consists of many components, a clear center of composition is important. This is achieved the easiest way with tone values.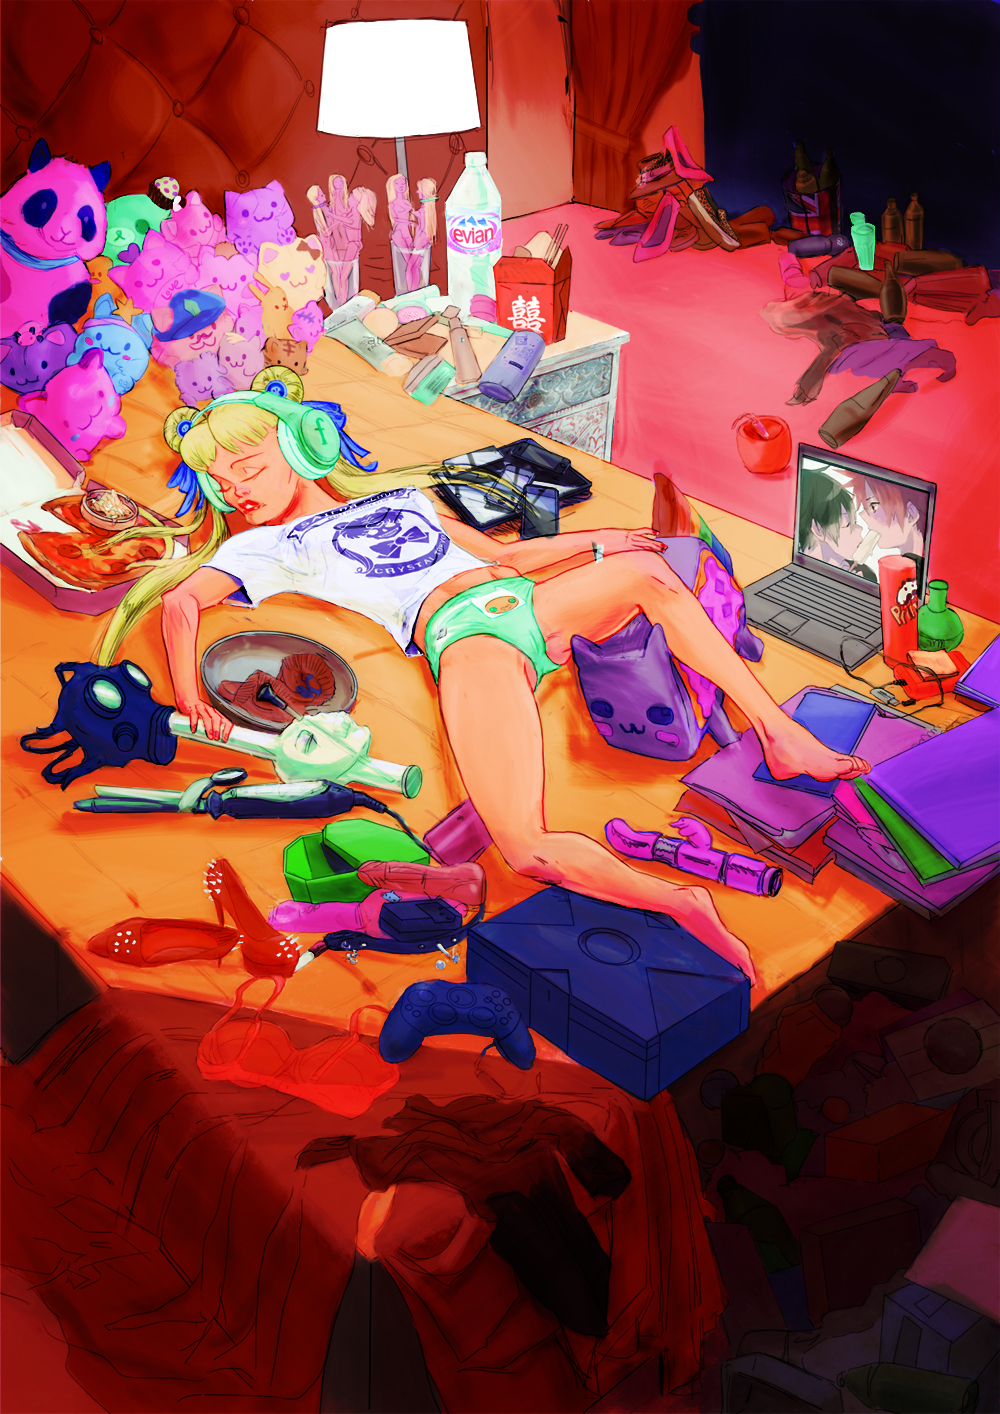
Schritt acht
Jetzt kommen die Schatten auf eine extra multiplizierte Ebene. Wie schon beim Licht verwende ich hier eine etwas fransigere Brush, um etwas Leben in die Farbflächen zu bringen. Über die Er- und Einstellung von Brushes könnte man auch ein ausführliches Extratutorien machen, doch auch dies geschieht nicht hier und jetzt. Ob man beim modellieren mit den Schatten oder Lichtern beginnt, ist Geschmacksache und im Grunde egal.
Step eight
Now come the shadows on an extra layer in multiply mode. As with light, I’m using a slightly more fringed brush to bring some life to the planes. About the creation and settings of brushes I could also do an extra tutorials, but this too does not happen here and now. Whether you start the modeling with the shadows or with the lights is a matter of taste and basically does not matter.
Schritt neun
Bis hierher ging alles relativ zügig und das Bild wirkt beinahe fertig. Beinahe! Das nun folgen langwierige Gefummel mit Deckkraft, Farbstimmung und vielen kleinen Details. Das braucht viel Zeit und ist tragisch wenig sichtbar. Doch unterlässt man es, haftet der Illu immer etwas unfertiges an. Hier gilt also die Pareto-Regel nicht. Schön auf den Hintern setzen, nicht sparen und ordentlich fertig malen.
Step nine
So far everything went relatively quickly and the picture is almost finished. Almost! This is followed by lengthy fumbling with opacity, color mood and many more small details. This takes a lot of time and is tragically less visible. But if you skip it, the illo always looks somewhat unfinished. So the pareto rule does not apply here. Sit on yout butt and don´t get up untill you are finished.
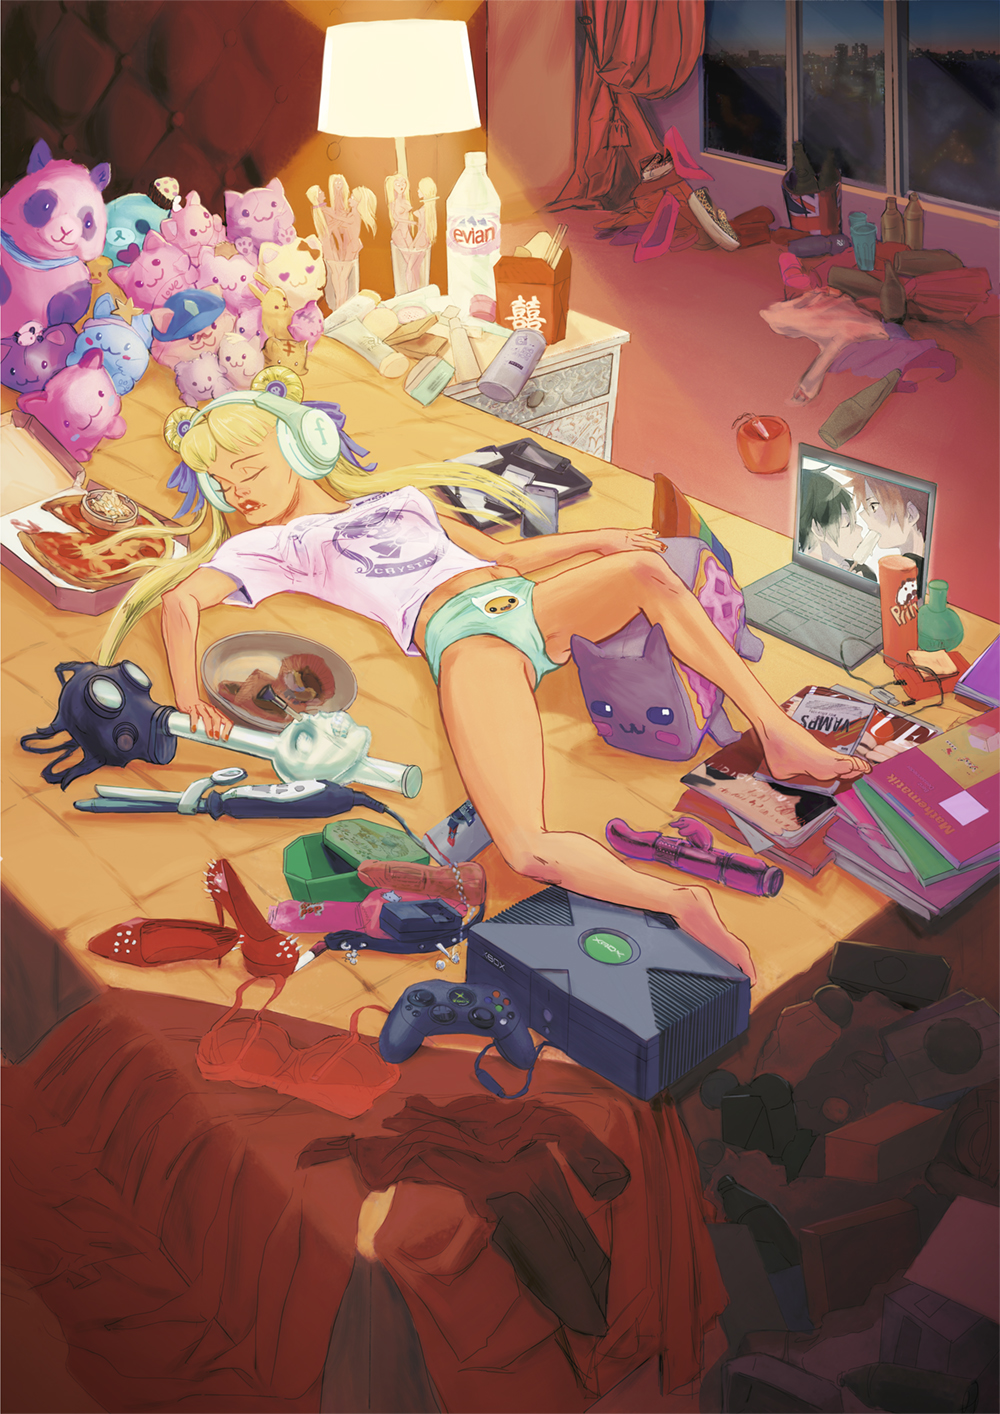
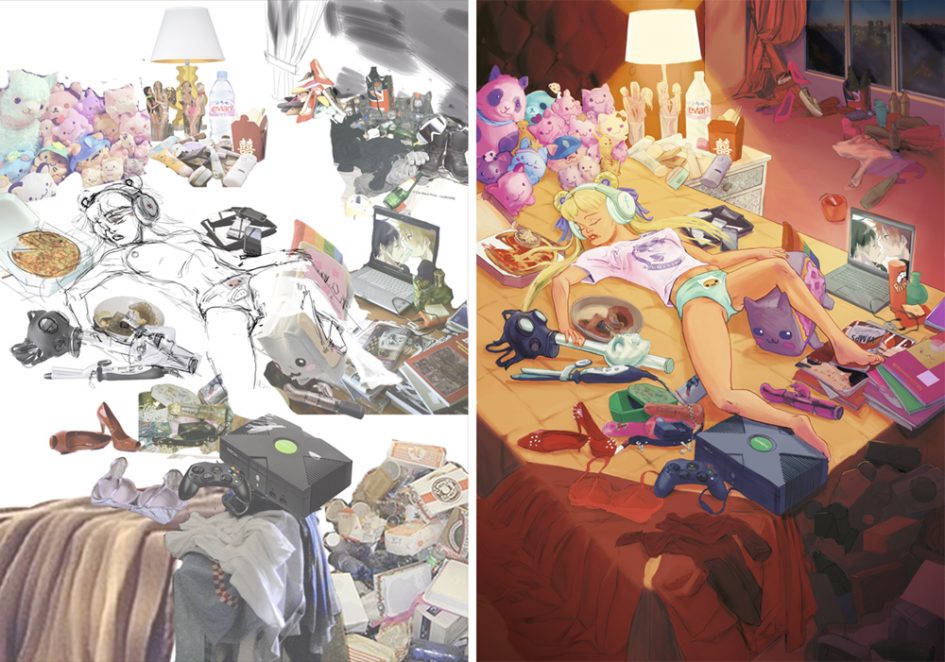
Schritt zehn
Viele Illustratoren und IllustratorInnen genießen dieses „Teppich knüpfen“, das aufwändige Fertigstellung der Illustration als eine Meditationsform. Ich bin relativ ungeduldig und genieße die Anfangsphase der Illustration mehr. Dennoch sehe ich ein, wenn man eine Illustration fertig machen will, gerade zu Schluss noch einige Arbeitsstunden investieren muss. Et voilà, das Ergebnis ist doch ein Unterschied zu Bild acht, obwohl da bereits alle Informationen vorhanden war.
Step ten
Many illustrators enjoy this “carpet knottig”, the elaborate completion of the illustration as a meditation form. I am relatively impatient and enjoy the beginning of the illustration more. Nevertheless I realize, if you want to finish an illustration, you just have to invest a few more hours at the end. Et voilà, the result makes quite a difference to picture eight, although all the information was already there.
Schreibe einen Kommentar